前期准备
- 域名、服务器备案
- 基础环境配置完成
- 宝塔面板 / 其他
部署
操作时请使用Linux终端或者直接使用远程终端
更新时间
2024年6月20日
✨特性
☁️ 支持本机、从机、七牛、阿里云 OSS、腾讯云 COS、又拍云、OneDrive (包括世纪互联版) 作为存储端
📤 上传/下载 支持客户端直传,支持下载限速
💾 可对接 Aria2 离线下载,可使用多个从机节点分担下载任务
📚 在线 压缩/解压缩、多文件打包下载
💻 覆盖全部存储策略的 WebDAV 协议支持
⚡ 拖拽上传、目录上传、流式上传处理
🗃️ 文件拖拽管理
👩👧👦 多用户、用户组
🔗 创建文件、目录的分享链接,可设定自动过期
👁️🗨️ 视频、图像、音频、文本、Office 文档在线预览
🎨 自定义主题颜色、深色模式、PWA 应用、SPA、i18n
🚀 多合一包装,具有开箱即用的所有功能。
🌈 ... ...
🛠️安装
当前安装环境只支持Linux系统
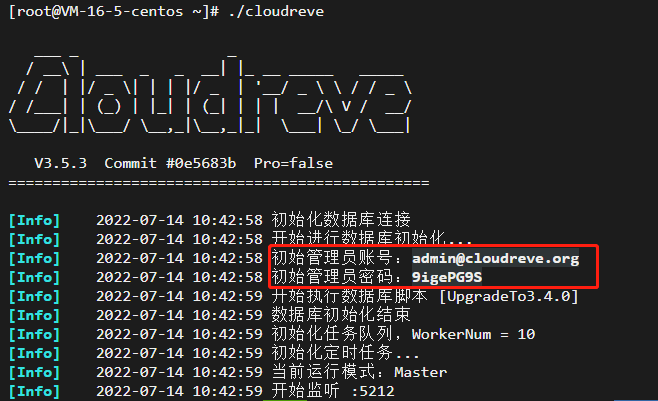
Cloudreve在首次启动时,会创建初始管理员账号,请注意保管密码,密码只有在首次启动才会出现。
# 下载Cloudreve
wget https://github.com/cloudreve/Cloudreve/releases/download/3.8.3/cloudreve_3.8.3_linux_amd64.tar.gz

# 解压获取到的主程序
tar -zxvf cloudreve_3.8.3_linux_amd64.tar.gz

# 赋予执行权限
chmod +x ./cloudreve

# 启动 Cloudreve
./cloudreve
如果不需要通过域名进行访问的话,到这里就算安装完成了。
注意,Cloudreve默认监听端口为
5212,请在服务器安全组开放此端口,如果是宝塔面板设置防火墙,请开启此端口通过ip+端口进行访问。例如:http://127.0.0.1:5212
域名访问
通过宝塔面板直接设置反向代理即可!可以参考下面文章内容进行配置。
进程守护
设置进程守护后无须每次单独启动Cloudreve
安装升级systemd
sudo yum install systemd-*编辑systemd配置文件
# 编辑配置文件
vim /usr/lib/systemd/system/cloudreve.service
添加内容
复制前请把
Documentation修改为你的域名,WorkingDirectory和ExecStart路径修改为你的Cloudreve安装路径,如果是默认安装目录,修改域名然后复制即可。
按
i进入编辑模式,将下面内容粘贴进去,然后按ESC键退出编辑模式,输入:wq按回车保存。
[Unit]
Description=Cloudreve
Documentation=https://pan.starsei.com
After=network.target
After=mysqld.service
Wants=network.target

[Service]
WorkingDirectory=/root
ExecStart=/root/cloudreve
Restart=on-abnormal
RestartSec=5s
KillMode=mixed

StandardOutput=null
StandardError=syslog

[Install]
WantedBy=multi-user.target
更新配置
# 更新配置
systemctl daemon-reload
启动服务
# 启动服务
systemctl start cloudreve
设置开机启动
# 设置开机启动
systemctl enable cloudreve
管理命令
# 启动服务
systemctl start cloudreve

# 停止服务
systemctl stop cloudreve

# 重启服务
systemctl restart cloudreve

# 查看状态
systemctl status cloudreve
原文档地址:


16 条评论
你的文章让我感受到了不一样的视角,非常精彩。 https://www.4006400989.com/qyvideo/78567.html
想问一下,博客左侧的云盘是cloudreve? 看了网上一些关于cloudreve的部署,看到他们的界面和左侧这个区别好大
之前用的cloudreve后来换掉了
不是 我左边的是alist 直接用docker挂载就行
插眼,感谢分享!
CloudReve 感觉很轻量,有时间部署下试试看!现在在家里的老破小上跑 NextCloud, 感觉还是有些太吃力了...
建议使用alist挂载自己的盘 也挺好的
这个很好用,so good
插个眼,下个月换服务器在搞~
我也是好多都没搞,会有在上点东西,每天忙的都没有时间去看呢
你左侧列表里面的云盘就是这篇文章所说的个人云盘系统吗?
嗯是的,之前喜欢哪些直接挂载云盘的,但是后来看到这个就换了
你用的是什么存储策略,我使用腾讯云COS配置好后上传提示Error: Network Error(错误:网络错误)⌇●﹏●⌇
存储策略那块的密钥都需要填写才可以的
我用的也是腾讯云COS不过一般我不从 网盘上传到COS桶,有没有可能你设置的腾讯云COS桶是私密模式
应该是网站初次设置问题,我用七牛依次设置一次成功。在研究研究
不错不错!感谢分享!